I may earn a small commission on sales made from links on this page... It enables me to keep bringing you new content!!

Monday, June 10, 2019

Corn and Cucumber Picnic Salad


Recipe by Cathy Kopp

Ingredients

6 ears fresh corn or 3 cups frozen corn
3 cucumbers chopped
1 red pepper chopped
1 green pepper chopped
1 red onion chopped

Dressing :

1-1/2 cups Italian dressing
2 Tbl vinegar
2 Tbl lemon juice
2 tsp sugar or sweetener
1 tsp salt
1 tsp pepper


Instructions:

1. Cook corn until tender.

Rinse under cold running water or put in an ice bath; drain well.

2. Chop cucumber, red and green peppers, and onion. Add to corn in large bowl.

3. In a small bowl mix salad dressing with the remaining ingredients then pour over corn mixture and toss well.

4. Chill 2 hours before serving.


#sides #BBQ #salads #healthy

Mexican Street Corn


Grilled Mexican Street Corn (Elotes)

An ultimate summer side dish! Corn cobs are grilled for a nice charred flavor then slathered with a creamy mayo mixture, rolled in cotija cheese and dusted with chili powder and cayenne for a little kick. No one can resist!

Ingredients
6 ears yellow corn , shucked (that pictured here is a double batch of this recipe)
1/2 cup mayonnaise (preferably 1/4 cup regular 1/4 cup light)
2 Tbsp finely chopped cilantro , plus more for garnish
1 small clove garlic minced
1 fair pinch cayenne pepper , plus more for topping, to taste
1 cup finely crumbled Cotija cheese    (possible substitute = parmesan cheese)
1/2 tsp ancho chili powder , then more to taste
Lime wedges , for serving (optional)


Instructions
Preheat a grill to medium-high heat (to about 450 degrees F).

Meanwhile, in a mixing bowl whisk stir together mayonnaise, cilantro, garlic, cayenne pepper. Set aside. Place cotija cheese in a shallow dish long enough to fit corn.
Once grill is preheated, place corn on grill, leaving space between them. Let grill until charred on all sides, turning every few minutes, about 8 - 9 minutes total.

Working with one cob of corn at a time, using a spatula brush all sides with the mayonnaise mixture then lightly roll in cheese to coat with a thin layer (it should look somewhat sparse, don't overdue it or the cheese will be overwhelming and you won't have enough to coat all of them). Transfer to a serving platter or baking sheet and repeat with remaining corn. Sprinkle corn with chili powder then a little cayenne pepper if desired, then turn to opposite side and sprinkle with more chili powder. Sprinkle lightly with more cilantro and serve with lime wedges if desired.


Recipe Notes
Sprinkle over the cotija if you want a lighter coating (rather than rolling).
Add chili powder to taste. Some people like a lot, while others like just a few dashes.


#grilled #fingerfood #sides #BBQ

Red, White and Blue Pinwheel Icebox Cookies


    Red, White and Blue Pinwheel Icebox Cookies (from justataste.com)

    INGREDIENTS
    3 cups all-purpose flour
    1/2 teaspoon baking powder
    1/2 teaspoon salt
    1 cup (2 sticks) unsalted butter
    1 1/3 cups sugar
    2 large eggs
    2 teaspoons vanilla extract
    Red food coloring
    Blue food coloring


    INSTRUCTIONS
    In a medium bowl, sift together the flour, baking powder and salt.

    In the bowl of a stand mixer fitted with the paddle attachment, beat the butter until smooth, about 2 minutes. Add the sugar and continue beating until the mixture is light and fluffy, about 3 minutes. Add the eggs one at a time, beating between each addition, then add the vanilla.

    Turn the mixer off. Add the flour and then beat just until combined. Remove the dough and separate it into three equal pieces. Shape one piece of the dough into a 4- by 4-inch square, wrap it securely in plastic wrap and place it in the fridge. (This will be the white portion of the cookies.)

    Return one of the remaining pieces of dough to the stand mixer bowl, and with the mixer on "low," add in the red food coloring until it reaches your desired color. Remove the red dough, shape it into a 4- by 4-inch square, wrap it securely in plastic wrap and place it in the fridge. (This will be the red portion of the cookies). Clean out the bowl to remove any red food coloring residue.

    Add the final piece of dough to the stand mixer bowl, and with the mixer on "low," add in the blue food coloring until it reaches your desired color. Remove the blue dough, shape it into a 4- by 4-inch square, wrap it securely in plastic wrap and place it in the fridge. (This will be the blue portion of the cookies.)

    Refrigerate the dough for 30 minutes.

    Remove the dough from the fridge and cut each square in half to form two rectangles. Wrap half of each color of dough in plastic wrap and return it to the fridge. Place the red dough in between two pieces of wax paper and roll it into a rectangle about 1/8-inch thick. Roll out the white dough between two separate pieces of wax paper until it is a rectangle about 1/8-inch thick. Roll out the blue dough between two separate pieces of wax paper until it is a rectangle about 1/8-inch thick.

    Peel the top layer of wax paper off of the red dough and then peel the wax paper off one side of the white dough and use the other side to transfer the white dough on top of the red dough. Peel off the wax paper from one side of the blue dough and use the other side to transfer it atop the white dough. Very lightly roll the three layers together.

    Starting at the shorter end of the rectangle, roll the dough as tightly as possible into a log. Repeat the rolling and stacking process with the remaining dough in the fridge. Wrap the logs in wax paper and then plastic wrap and refrigerate them for 1 hour.

    Remove the dough logs and roll them on the counter several times so they don't develop a flat side. Alternately, stand the rolls up in glasses in the fridge. Refrigerate the dough for 4 more hours.

    When ready to bake, preheat the oven to 350ºF and line two baking sheets with parchment paper. Remove the dough from the fridge and slice each log into 1/4-inch rounds. Place the rounds about 2 inches apart on the baking sheets, as the cookies will expand when baked.

    Bake the cookies for 9 to 11 minutes until pale golden, and then transfer them to a wrack to cool completely.


#fourthofjuly #independenceday #cookies #holiday #redwhiteblue #redwhiteandblue #desserts

Kid Friendly Red, White and Blue Punch


 Kid Friendly Red White and Blue Punch (from momendeavors.com)

To get the layered effect, you’ll need to do a few things:

Start by filling the glass about 1/4-1/3 of the way up with the drink with the highest sugar content per serving (red in this case).
Then, fill the cup FULL with ice.
Pour the drink with the next highest sugar content (white in this case) very slowly over the ice. You’ll use the ice as a sort of buffer – pouring directly on to the ice with a very slow pour (small amount). If you just pour a whole bunch in quickly, the colors will combine.
Repeat with the last layer (blue in this case)
Snip the ends off of a Twizzlers candy and place in the drink for a straw. For some added fun, you could take some of the red, white, and blue Twizzlers PULL ‘N’ PEEL candy to add a little edible bow or tie to your straw.


(In this case, a cran-cherry juice (red) was used, a kid-friendly piña colada drink (white), and a blue raspberry drink (blue). You can see that the red & white mixed just a bit (their sugar contents only differed by 3g). But, it actually did look more white in real life than the picture shows!


#independenceday #patriotic #fourthofjuly #punch #redwhiteandblue #redwhiteblue #drinks #kidfriendly #holiday #fireworks

Red, White, and Blue Poke Cake


Red, white and beautiful! A simple cake-mix cake becomes the hit of your Fourth of July gathering with just a few easy additions.
By Betty Crocker Kitchens

Ingredients
1 box  Super Moist™ white cake mix
(and Water, vegetable oil and whole eggs called for on cake mix box)
1 box (3 oz) Jell-O™ strawberry-flavored gelatin
1 cup boiling water
1/2 cup cold water
1 box (3.3 oz) Jell-O™ white chocolate-flavor instant pudding & pie filling mix
1/2 cup cold milk
1 container (8 oz) Cool Whip™ frozen whipped topping, thawed
1 cup sliced fresh strawberries
1/2 cup fresh blueberries


Steps
1
Heat oven to 350°F (325°F for dark or nonstick pan). Make and bake cake mix as directed on box for 13x9-inch pan. Cool on cooling rack 20 minutes.
2
With tines of fork(or handle of a wooden spoon), poke holes almost to bottom of warm cake about every 1/2 inch. In medium bowl, stir gelatin and boiling water until dissolved. Stir in cold water. Carefully pour mixture evenly over top of cake. Refrigerate, loosely covered, at least 3 hours but no longer than 12 hours until serving time.
3
In large bowl, beat pudding mix and milk with whisk until blended and smooth. Gently stir in whipped topping. Drop by spoonfuls over top of cake; carefully spread until even. Arrange strawberries and blueberries on top of cake to look like flag. Store loosely covered in refrigerator.


Tips:
Make ahead! Make and bake cake mix as directed on box for 13x9-inch pan. Cool on cooling rack 20 minutes. Poke holes in warm cake with fork. Make gelatin mixture, and carefully pour over top of cake. Loosely cover, and refrigerate overnight. When ready to serve, make pudding mixture. Remove cake from refrigerator; uncover, and top with pudding mixture. Decorate top with fruit.

The gelatin mixture needs time to set and cool completely in the poked cake, so for best results, refrigerate at least 3 hours before spreading pudding mixture on top.

Can’t find white chocolate instant pudding? Replace with 1 box (3.4 oz) Jell-O™ vanilla-flavor instant pudding & pie filling mix.


#independenceday #redwhiteblue #redwhiteandblue #dessert #holiday #fireworks 

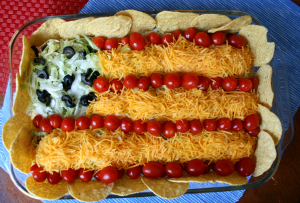
Taco Salad Flag


Flag Taco Salad - Taco salad put together in a glass dish


Easy Taco Salad Flag

Ingredients
1 pound ground beef  (or vegetarian crumble)
3/4 cup water
1/4 cup salsa
1 envelope taco seasoning
4-6 cups tortilla chips
4  cups shredded lettuce
1/2 cup  pitted large olives, sliced lengthwise
2 cups  shredded cheddar cheese
2-3 cups cherry tomatoes
Directions
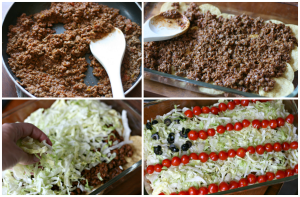
1. In a large skillet, cook beef over a medium heat until meat is no longer pink. Drain off any extra grease. Next,  stir in the water, salsa  and taco seasoning. Bring to a simmer and cook uncovered for about 10 minutes, or until most of the liquid is absorbed.
2. Place chips in a 13-in. x 9-in. dish.  Next spread beef evenly over the top of chips.
Easy Taco Salad Flag - Show steps to make taco salad. Browning beef, and layering casserole3. Cover beef  with a layer of lettuce.
4. Arrange olive slices together in the upper left corner to form stars. For the  stripes, alternate tomatoes and cheese.  I added a couple extra chips to the side of the dish for some extra crunch.
NOTE: If you are making this several hours in advance, I would skip placing the chips at the bottom of the taco salad and just serve them on the side.
Optional: I also like to drizzle a little bit of Italian dressing or salsa over the individual servings 🙂


#fourthofjuly #independenceday #redwhiteblue #redwhiteandblue #healthy #vegetarian #holiday #fireworks #maindish #salad #easy

Tuesday, January 29, 2019

CHICKEN, BROCCOLI & RICE CASSEROLE


Ingredients
2 cups water
2 cups uncooked instant rice
2 (10 ounce) cans chunk chicken, drained
1 (10.75 ounce) can condensed cream of mushroom soup
1 (10.75 ounce) can condensed cream of chicken soup
1/4 cup butter
1 cup milk
1 (16 ounce) package frozen chopped broccoli
1 small white onion, chopped
1 pound processed cheese food


Directions
Preheat oven to 350 degrees F (175 degrees C).
In a medium saucepan, bring the water to a boil. Mix in the instant rice, cover, and remove from heat. Let stand 5 minutes.
In a 9x13 inch baking dish, mix the prepared rice, chicken, cream of mushroom soup, cream of chicken soup, butter, milk, broccoli, onion, and processed cheese.
Bake in the preheated oven for 30 to 35 minutes, or until cheese is melted. Stir halfway through cooking to help cheese melt evenly.