I may earn a small commission on sales made from links on this page... It enables me to keep bringing you new content!!

Monday, June 10, 2019

Corn and Cucumber Picnic Salad


Recipe by Cathy Kopp

Ingredients

6 ears fresh corn or 3 cups frozen corn
3 cucumbers chopped
1 red pepper chopped
1 green pepper chopped
1 red onion chopped

Dressing :

1-1/2 cups Italian dressing
2 Tbl vinegar
2 Tbl lemon juice
2 tsp sugar or sweetener
1 tsp salt
1 tsp pepper


Instructions:

1. Cook corn until tender.

Rinse under cold running water or put in an ice bath; drain well.

2. Chop cucumber, red and green peppers, and onion. Add to corn in large bowl.

3. In a small bowl mix salad dressing with the remaining ingredients then pour over corn mixture and toss well.

4. Chill 2 hours before serving.


#sides #BBQ #salads #healthy

Mexican Street Corn


Grilled Mexican Street Corn (Elotes)

An ultimate summer side dish! Corn cobs are grilled for a nice charred flavor then slathered with a creamy mayo mixture, rolled in cotija cheese and dusted with chili powder and cayenne for a little kick. No one can resist!

Ingredients
6 ears yellow corn , shucked (that pictured here is a double batch of this recipe)
1/2 cup mayonnaise (preferably 1/4 cup regular 1/4 cup light)
2 Tbsp finely chopped cilantro , plus more for garnish
1 small clove garlic minced
1 fair pinch cayenne pepper , plus more for topping, to taste
1 cup finely crumbled Cotija cheese    (possible substitute = parmesan cheese)
1/2 tsp ancho chili powder , then more to taste
Lime wedges , for serving (optional)


Instructions
Preheat a grill to medium-high heat (to about 450 degrees F).

Meanwhile, in a mixing bowl whisk stir together mayonnaise, cilantro, garlic, cayenne pepper. Set aside. Place cotija cheese in a shallow dish long enough to fit corn.
Once grill is preheated, place corn on grill, leaving space between them. Let grill until charred on all sides, turning every few minutes, about 8 - 9 minutes total.

Working with one cob of corn at a time, using a spatula brush all sides with the mayonnaise mixture then lightly roll in cheese to coat with a thin layer (it should look somewhat sparse, don't overdue it or the cheese will be overwhelming and you won't have enough to coat all of them). Transfer to a serving platter or baking sheet and repeat with remaining corn. Sprinkle corn with chili powder then a little cayenne pepper if desired, then turn to opposite side and sprinkle with more chili powder. Sprinkle lightly with more cilantro and serve with lime wedges if desired.


Recipe Notes
Sprinkle over the cotija if you want a lighter coating (rather than rolling).
Add chili powder to taste. Some people like a lot, while others like just a few dashes.


#grilled #fingerfood #sides #BBQ

Red, White and Blue Pinwheel Icebox Cookies


    Red, White and Blue Pinwheel Icebox Cookies (from justataste.com)

    INGREDIENTS
    3 cups all-purpose flour
    1/2 teaspoon baking powder
    1/2 teaspoon salt
    1 cup (2 sticks) unsalted butter
    1 1/3 cups sugar
    2 large eggs
    2 teaspoons vanilla extract
    Red food coloring
    Blue food coloring


    INSTRUCTIONS
    In a medium bowl, sift together the flour, baking powder and salt.

    In the bowl of a stand mixer fitted with the paddle attachment, beat the butter until smooth, about 2 minutes. Add the sugar and continue beating until the mixture is light and fluffy, about 3 minutes. Add the eggs one at a time, beating between each addition, then add the vanilla.

    Turn the mixer off. Add the flour and then beat just until combined. Remove the dough and separate it into three equal pieces. Shape one piece of the dough into a 4- by 4-inch square, wrap it securely in plastic wrap and place it in the fridge. (This will be the white portion of the cookies.)

    Return one of the remaining pieces of dough to the stand mixer bowl, and with the mixer on "low," add in the red food coloring until it reaches your desired color. Remove the red dough, shape it into a 4- by 4-inch square, wrap it securely in plastic wrap and place it in the fridge. (This will be the red portion of the cookies). Clean out the bowl to remove any red food coloring residue.

    Add the final piece of dough to the stand mixer bowl, and with the mixer on "low," add in the blue food coloring until it reaches your desired color. Remove the blue dough, shape it into a 4- by 4-inch square, wrap it securely in plastic wrap and place it in the fridge. (This will be the blue portion of the cookies.)

    Refrigerate the dough for 30 minutes.

    Remove the dough from the fridge and cut each square in half to form two rectangles. Wrap half of each color of dough in plastic wrap and return it to the fridge. Place the red dough in between two pieces of wax paper and roll it into a rectangle about 1/8-inch thick. Roll out the white dough between two separate pieces of wax paper until it is a rectangle about 1/8-inch thick. Roll out the blue dough between two separate pieces of wax paper until it is a rectangle about 1/8-inch thick.

    Peel the top layer of wax paper off of the red dough and then peel the wax paper off one side of the white dough and use the other side to transfer the white dough on top of the red dough. Peel off the wax paper from one side of the blue dough and use the other side to transfer it atop the white dough. Very lightly roll the three layers together.

    Starting at the shorter end of the rectangle, roll the dough as tightly as possible into a log. Repeat the rolling and stacking process with the remaining dough in the fridge. Wrap the logs in wax paper and then plastic wrap and refrigerate them for 1 hour.

    Remove the dough logs and roll them on the counter several times so they don't develop a flat side. Alternately, stand the rolls up in glasses in the fridge. Refrigerate the dough for 4 more hours.

    When ready to bake, preheat the oven to 350ºF and line two baking sheets with parchment paper. Remove the dough from the fridge and slice each log into 1/4-inch rounds. Place the rounds about 2 inches apart on the baking sheets, as the cookies will expand when baked.

    Bake the cookies for 9 to 11 minutes until pale golden, and then transfer them to a wrack to cool completely.


#fourthofjuly #independenceday #cookies #holiday #redwhiteblue #redwhiteandblue #desserts

Kid Friendly Red, White and Blue Punch


 Kid Friendly Red White and Blue Punch (from momendeavors.com)

To get the layered effect, you’ll need to do a few things:

Start by filling the glass about 1/4-1/3 of the way up with the drink with the highest sugar content per serving (red in this case).
Then, fill the cup FULL with ice.
Pour the drink with the next highest sugar content (white in this case) very slowly over the ice. You’ll use the ice as a sort of buffer – pouring directly on to the ice with a very slow pour (small amount). If you just pour a whole bunch in quickly, the colors will combine.
Repeat with the last layer (blue in this case)
Snip the ends off of a Twizzlers candy and place in the drink for a straw. For some added fun, you could take some of the red, white, and blue Twizzlers PULL ‘N’ PEEL candy to add a little edible bow or tie to your straw.


(In this case, a cran-cherry juice (red) was used, a kid-friendly piña colada drink (white), and a blue raspberry drink (blue). You can see that the red & white mixed just a bit (their sugar contents only differed by 3g). But, it actually did look more white in real life than the picture shows!


#independenceday #patriotic #fourthofjuly #punch #redwhiteandblue #redwhiteblue #drinks #kidfriendly #holiday #fireworks

Red, White, and Blue Poke Cake


Red, white and beautiful! A simple cake-mix cake becomes the hit of your Fourth of July gathering with just a few easy additions.
By Betty Crocker Kitchens

Ingredients
1 box  Super Moist™ white cake mix
(and Water, vegetable oil and whole eggs called for on cake mix box)
1 box (3 oz) Jell-O™ strawberry-flavored gelatin
1 cup boiling water
1/2 cup cold water
1 box (3.3 oz) Jell-O™ white chocolate-flavor instant pudding & pie filling mix
1/2 cup cold milk
1 container (8 oz) Cool Whip™ frozen whipped topping, thawed
1 cup sliced fresh strawberries
1/2 cup fresh blueberries


Steps
1
Heat oven to 350°F (325°F for dark or nonstick pan). Make and bake cake mix as directed on box for 13x9-inch pan. Cool on cooling rack 20 minutes.
2
With tines of fork(or handle of a wooden spoon), poke holes almost to bottom of warm cake about every 1/2 inch. In medium bowl, stir gelatin and boiling water until dissolved. Stir in cold water. Carefully pour mixture evenly over top of cake. Refrigerate, loosely covered, at least 3 hours but no longer than 12 hours until serving time.
3
In large bowl, beat pudding mix and milk with whisk until blended and smooth. Gently stir in whipped topping. Drop by spoonfuls over top of cake; carefully spread until even. Arrange strawberries and blueberries on top of cake to look like flag. Store loosely covered in refrigerator.


Tips:
Make ahead! Make and bake cake mix as directed on box for 13x9-inch pan. Cool on cooling rack 20 minutes. Poke holes in warm cake with fork. Make gelatin mixture, and carefully pour over top of cake. Loosely cover, and refrigerate overnight. When ready to serve, make pudding mixture. Remove cake from refrigerator; uncover, and top with pudding mixture. Decorate top with fruit.

The gelatin mixture needs time to set and cool completely in the poked cake, so for best results, refrigerate at least 3 hours before spreading pudding mixture on top.

Can’t find white chocolate instant pudding? Replace with 1 box (3.4 oz) Jell-O™ vanilla-flavor instant pudding & pie filling mix.


#independenceday #redwhiteblue #redwhiteandblue #dessert #holiday #fireworks 

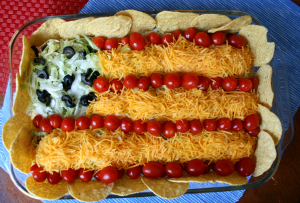
Taco Salad Flag


Flag Taco Salad - Taco salad put together in a glass dish


Easy Taco Salad Flag

Ingredients
1 pound ground beef  (or vegetarian crumble)
3/4 cup water
1/4 cup salsa
1 envelope taco seasoning
4-6 cups tortilla chips
4  cups shredded lettuce
1/2 cup  pitted large olives, sliced lengthwise
2 cups  shredded cheddar cheese
2-3 cups cherry tomatoes
Directions
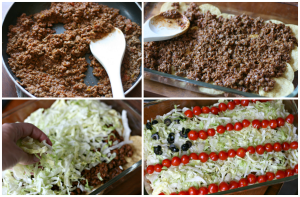
1. In a large skillet, cook beef over a medium heat until meat is no longer pink. Drain off any extra grease. Next,  stir in the water, salsa  and taco seasoning. Bring to a simmer and cook uncovered for about 10 minutes, or until most of the liquid is absorbed.
2. Place chips in a 13-in. x 9-in. dish.  Next spread beef evenly over the top of chips.
Easy Taco Salad Flag - Show steps to make taco salad. Browning beef, and layering casserole3. Cover beef  with a layer of lettuce.
4. Arrange olive slices together in the upper left corner to form stars. For the  stripes, alternate tomatoes and cheese.  I added a couple extra chips to the side of the dish for some extra crunch.
NOTE: If you are making this several hours in advance, I would skip placing the chips at the bottom of the taco salad and just serve them on the side.
Optional: I also like to drizzle a little bit of Italian dressing or salsa over the individual servings 🙂


#fourthofjuly #independenceday #redwhiteblue #redwhiteandblue #healthy #vegetarian #holiday #fireworks #maindish #salad #easy

Tuesday, January 29, 2019

CHICKEN, BROCCOLI & RICE CASSEROLE


Ingredients
2 cups water
2 cups uncooked instant rice
2 (10 ounce) cans chunk chicken, drained
1 (10.75 ounce) can condensed cream of mushroom soup
1 (10.75 ounce) can condensed cream of chicken soup
1/4 cup butter
1 cup milk
1 (16 ounce) package frozen chopped broccoli
1 small white onion, chopped
1 pound processed cheese food


Directions
Preheat oven to 350 degrees F (175 degrees C).
In a medium saucepan, bring the water to a boil. Mix in the instant rice, cover, and remove from heat. Let stand 5 minutes.
In a 9x13 inch baking dish, mix the prepared rice, chicken, cream of mushroom soup, cream of chicken soup, butter, milk, broccoli, onion, and processed cheese.
Bake in the preheated oven for 30 to 35 minutes, or until cheese is melted. Stir halfway through cooking to help cheese melt evenly.

Caramel Apple Dump Cake


•2 cans of apple pie filling (you can also use cherry, blueberry, etc.)
•1 box of yellow cake mix
•2 sticks of butter, melted (1 cup)
•1/2 cup caramel sauce (like you would put on ice cream)
•1/2 tsp cinnamon (optional)
•1/2 cup chopped pecans (optional)
•Whipped cream for garnish (optional)

Instructions
1.In a greased 9x13 dish, mix apple pie filling and caramel sauce.
2.You may add in the 1/2 tsp cinnamon if desired.
3.Spread evenly in pan.
4.Pour dry cake mix directly on top of the pie filing and spread evenly.
5.Top with melted butter and pecans (optional).
6.Bake at 350 degrees for 45-50 minutes or until top is golden brown and apple filling is bubbly around the edges.
7.Serve with ice cream or whipped cream and another drizzle of caramel sauce.

Chocolate Peanut Butter No-Bake Dessert


Serves 8
Ingredients
  1. 20 Oreo cookies, divided
  2. 2 tablespoons butter, softened
  3. 1 package (8 oz.) cream cheese, softened
  4. 1/2 cup peanut butter
  5. 1-1/2 cups confectioners' sugar,divided
  6. 1 carton (16 ounces) frozen whipped topping, thawed, divided
  7. 15-20 miniature peanut butter cups, chopped
  8. 1 cup cold milk
  9. 1 package (3.9 ounces) instant chocolate pudding mix

Instructions
  1. Crush 16 cookies; toss with the butter. Press into an ungreased 9-inch square dish; set aside.
  2. In a large bowl, beat the cream cheese, peanut butter and 1 cup confectioners' sugar until smooth.
  3. Fold in half of the whipped topping. Spread over crust.
  4. Sprinkle with chopped peanut butter cups.
  5. In another large bowl, beat the milk, pudding mix and remaining confectioners' sugar on low speed for 2 minutes. Let stand for 2 minutes or until soft-set.
  6. Fold in remaining whipped topping. Spread over peanut butter cups.
  7. Crush remaining cookies; sprinkle over the top. Cover and chill for at least 3 hours.


CHEESY VEGGIE QUESADILLAS


Ingredients: 
1 onion diced, 
1 each red and green pepper, seeded and diced, 
6 tortillas medium size, 
1 tbsp. canola oil, 
4 cups of shredded cheese, 
sour cream and salsa optional

1Heat oil in large skillet over medium high heat. Add onion and peppers stirring for 4 to 8 minutes until vegetables are tender and lightly browned. Remove vegetables from pan and set aside.

2Lightly coat one side of the tortilla with canola oil and place oil side in  a skillet over medium heat. Add 2/3 cup of cheese evenly on the tortilla, followed by 1/3 of the vegetable mixture. Next layer2/3 cup of cheese evenly on top of the vegetables. Place a second tortilla on top and brush lightly with oil.

3Cook quesadilla for 4  to 6 minutes flipping once, until cheese  is melted and tortillas are lightly browned. Repeat with remaining ingredients.

4Cut each quesadilla into eight pieces, and serve warm with sour cream and salsa

HONEY MUSTARD MEATBALL DINNER SUB


INGREDIENTS:
3tbsp chili sauce or ketchup, 
1egg,  
1/4 cup dry seasoned  bread crumbs, 
1 small garlic clove minced, 
1tbsp Worcestershire sauce, 
1tsp dried oregano, 
1/2tsp dried thyme, 
1/4 tsp pepper, 
1 lb extra lean ground beef, (Personalize  by using ground chicken, pork, turkey or veal)
2tsp canola oil, 
1 small onion, minced, 
1/4 cup honey mustard, 
1/4 cup water, 
6 small whole wheat sub buns,
1 cup chopped lettuce, 
1 tomato, chopped

1 In a large bowl. using fork stir together chili sauce, egg, breadcrumbs, garlic,  Worcestershire sauce, oregano, thyme and pepper until well combined. Add beef and mix together using hands to distribute evenly.

2 Using hands, roll meat mixture into about 30, 1 inch meatballs and place on parchment paper lined plate or tray.

3 Heat non stick skillet over medium - high heat, and brown meatballs in batches if necessary, turning occasionally on all sides for about 8 minutes or until browned. Remove.

4 Wipe skillet with paper towel and return to medium heat and add oil and cook onion for about 5 minutes or until softened. Add mustard and water; return meatballs to skillet and toss to coat, stirring occasionally with sauce for 3 minutes or until meatballs are no longer pink inside.

5 Divide meatballs and sauce among sub buns and top with lettuce and tomato

Crock Pot Parmesan Honey Pork Roast


Ingredients:

1 boneless whole pork loin roast (4 pounds)
2/3 cup grated Parmesan cheese
1/2 cup honey
3 tablespoons soy sauce
2 tablespoons dried basil
2 tablespoons minced garlic
2 tablespoons olive oil
1/2 teaspoon salt
2 tablespoons cornstarch
1/4 cup cold water

Directions:

Cut roast in half. Transfer to a 3-qt. slow cooker. In a small bowl, combine the cheese, honey, soy sauce, basil, garlic, oil and salt; pour over pork. Cover and cook on low for 5-1/2 to 6 hours or until a meat thermometer reads 160°.

Remove meat to a serving platter; keep warm. Skim fat from cooking juices; transfer to a small saucepan. Bring liquid to a boil. Combine cornstarch and water until smooth. Gradually stir into pan. Bring to a boil; cook and stir for 2 minutes or until thickened. Slice roast; serve with gravy. Yield: 10 servings.


MYO Brownie Mix


Never buy boxed brownie mix again! Follow the recipe below and make brownies for approximately .30 a mix!

So simple, so easy. Not just frugal but cuts out the unknown ingredients.

1 Cup Sugar, 
1/2 Cup All-Purpose Flour, 
1/3 Cup Cocoa, 
1/4 tsp Salt, 
1/4 tsp Baking Powder.

Put mix in plastic zip-lock bags or mason jars, and Label:
At Baking Time Add: 2 Eggs, 1/...2 Cup Vegetable Oil, 1 teaspoon Vanilla.
Bake @ 350 degrees for 20-25 minutes in an 8x8 or 9x9 pan.


Cucumber Salad in a Jar


This will stay fresh for 2 months!!! Yummy snack!

Makes 2 quart jars. Store in refrigerator,
Ingredients:
7 large dills, pickling cucumbers unpeeled sliced thin
1 1/2 cup sliced onions
1 1/2 cup sliced red peppers...
1-tbsp salt
1-cup white vinegar
2-cups sugar
1-tsp celery seed
1-tsp mustard seed
Directions:
Mix cucumbers, onions, peppers and salt in one bowl and set aside
Put vinegar, sugar, celery seed and mustard seed in a cooking pot and bring to a boil
Remove from heat and let cool for one hour before pouring over cucumber mixture
Pour mixture over vegetables
Put in jars and store in refrigerator
Will keep up to 2 months

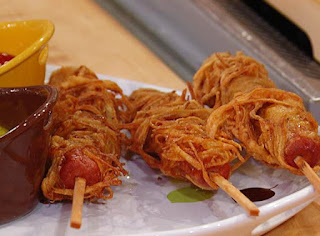
Sunny's Tater Dogs on a Stick


Ingredients
1 Russet potato, skin-on, finely shredded on a mandolin and soaked in water for at least 1 hour 
4 hot dogs 
4 wooden chopsticks 
1/8 cup flour, plus more for dusting 
1/2 tablespoon sweet paprika 
1/2 tablespoon garlic powder 
1/2 tablespoon onion powder 
1/2 teaspoon salt 
Freshly ground black pepper 
1 egg 
Peanut oil, for frying 
Special equipment: Deep fryer
Preparation

Using one chopstick per hot dog, slowly pierce one end of each hot dog with the tapered end of the stick and guide it three-quarters of the way up each hot dog. Dust each hot dog with flour and shake off excess. Set aside.

In a medium bowl, add 1/8 cup flour, paprika, garlic powder, onion powder, salt and a grind or two of black pepper. Whisk in egg.

Drain potatoes in a colander and rinse with water. Using a clean kitchen towel or paper towels, place shredded potatoes in the center and close corners of cloth or paper towels. Twist in alternate directions with the potatoes in a ball in one hand and the excess towel in the other, squeezing out as much excess moisture as possible. Add dried potato shreds in bowl with egg mixture and combine until blended.

Heat oil in deep fryer to 350F.

Divide potato mixture into four even sections and, using your hands, press potato mixture around each hot dog.

Fry until golden brown on all sides, about 5-7 minutes each.

Lemon Blueberry Cheesecake


Classic cheesecake is an ultimate dessert for holiday entertaining.

Ingredients
Crust:
2 cups finely ground graham crackers (about 30 squares)
1/2 teaspoon ground cinnamon
1 stick unsalted butter, melted

Filling:
1 pound cream cheese, 2 (8-ounce) blocks, softened
3 eggs
1 cup sugar
1 pint sour cream
1 lemon, zested
1 dash vanilla extract


Warm Lemon Blueberry Topping, recipe follows

Warm Lemon Blueberries:
1 pint blueberries
1 lemon, zested and juiced
2 tablespoons sugar
Directions
Filling:
Preheat the oven to 325 degrees F.

For the Crust:

In a mixing bowl, combine the ingredients with a fork until evenly moistened. Lightly coat the bottom and sides of an 8-inch springform pan with non-stick cooking spray.

Pour the crumbs into the pan and, using the bottom of a measuring cup or the smooth bottom of a glass, press the crumbs down into the base and 1-inch up the sides. Refrigerate for 5 minutes.

For the Filling:

In the bowl of an electric mixer, beat the cream cheese on low speed for 1 minute until smooth and free of any lumps. Add the eggs, 1 at a time, and continue to beat slowly until combined. Gradually add sugar and beat until creamy, for 1 to 2 minutes.

Add sour cream, lemon zest, and vanilla. Periodically scrape down the sides of the bowl and the beaters. The batter should be well-mixed but not overbeaten. Pour the filling into the crust-lined pan and smooth the top with a spatula.

Set the cheesecake pan on a large piece of aluminum foil and fold up the sides around it. Place the cake pan in a large roasting pan. Pour boiling water into the roasting pan until the water is about halfway up the sides of the cheesecake pan; the foil will keep the water from seeping into the cheesecake. Bake for 45 minutes. The cheesecake should still jiggle (it will firm up after chilling), so be careful not to overcook. Let cool in pan for 30 minutes. Chill in the refrigerator, loosely covered, for at least 4 hours. Loosen the cheesecake from the sides of the pan by running a thin metal spatula around the inside rim. Unmold and transfer to a cake plate. Using a spatula spread a layer of Warm Lemon Blueberry topping over the surface.

Slice the cheesecake with a thin, non-serrated knife that has been dipped in hot water. Wipe dry after each cut.

Warm Lemon Blueberries:
In a small saucepan add all the ingredients and simmer over medium heat for 5 minutes or so until the fruit begins to break down slightly. Leave to cool before spreading on cheesecake.

Yield: 6 servings

Biscuit Breakfast Bake


10 eggs
1/2 cup milk
1 16 oz refrigerated breakfast biscuits 10 count (I used the Pillsbury flaky kind .. I've also used 2, 8 count crescent rolls and 2, 8 count grands country biscuits
4 green onions, chopped ... white and green parts
2 cups shredded extra sharp cheddar cheese
If you’re into the meats – cooked center cut bacon or cooked sausage, ham, turkey sausage/bacon (5-6 slices bacon, cooked n chopped ... 6 breakfast sausages, cooked n chopped ... 1 cup diced cooked ham)
Large baking casserole dish, sprayed with cooking spray (Note: I think a 9×13 works best, but it might need to bake a little longer)

1. Mix your eggs and milk in a large bowl. Cut each biscuit into fours and add it to the bowl. I like to do this before I cook the bacon or cut up the green onions and other fillings – give the biscuits some time to really soak in the eggs. *when I use crescent rolls I just roll as per regular instructions and don't cut them .. the biscuits or crescent rolls are UNBAKED, DO NOT PRECOOK!!!

2. Cut up your green onions,, shred your cheese, cook and break up your bacon (or sausage), and any extras you're adding in. Add everything to the bowl. Add only half the cheese, use rest for the top.

3. Mix it all up and pour into your pan. Bake, covered loosely with foil at 375 for 25-30 minutes .. closer to 30 so it isn't runny Uncover and bake another 10-15 minutes. Add some more shredded cheese on top when you uncover it for added yumminess!!

Insanely DEEEEELICIOUS!! Serve with Fresh Fruit Salad, muffins, breakfast pastries and lotsa coffee/tea and assorted juices :)

*** Hint/Tip *** - if you want to make this the night before leave it in the mixing bowl in the fridge covered with saran. In the morning, give it a good stir then pour into prepared baking dish and proceed to bake as directed!!!
Add in extras like, sliced fresh mushrooms, diced assorted peppers, jalapenos, sliced red or white cooking onions, seeded chopped tomatoes, feta cheese ... so many ways you can customize it to your preference!!!
This is scrumptious when served topped with your favorite salsa mmmmmmm yummo!!

Pineapple Cole Slaw


~ Great side dish for a cook out or with Easter Dinner!

1 head of white cabbage sliced thin
1 head of purple cabbage sliced thin
2 cups julienne carrots
1 teaspoon celery seed
1 pineapple cored, cleaned and sliced in thin slices

3/4 cups granulated sugar
6 oz pineapple juice
2 cups mayonnaise

~Mix dressing together
~Toss with dry mixture
~Season with salt and pepper to taste

Switchel


How To Make Switchel + 5 Reasons Why You Should Be Drinking This Magical Potion


Long before the invention of sugary sodas, energy drinks, and vitamin water, there was switchel. An old-timey beverage to be sure, switchel is many things – thirst-quenching, refreshing, energizing, healthful – and it has recently regained some of the limelight it once enjoyed, thanks to both hipsters and health enthusiasts alike.

While it is believed to have originated in the hot tropics of the Caribbean, switchel was a popular refreshment in the American colonies (particularly New England) in the 17th century. Drank by sailors, laborers, politicians, and university students (who had a habit of spiking it with rum), switchel was a beverage for everyone regardless of social or economic status. And it’s easy to see why: switchel is a concoction that is perfect for combatting long days in sweltering heat, allowing imbibers to keep cool and stay hydrated. In fact, farmers working the fields would often guzzle it by the jug, giving it its other name, haymaker’s punch.

Easy to make, switchel contains just four basic ingredients: water, vinegar, sweetener, and ginger. It was a popular alternative to ice water, which was very difficult to obtain before the age of ice boxes and freezers, and physicians of the era warned against drinking it because they believed cold drinks on hot days would cause indigestion. Although it was originally made with vinegar, water, and either molasses, honey, or maple syrup as a sweetener, eventually ginger was added to the mix to prevent bloating, allowing people to drink it all day long without worrying about upsetting their stomachs.

But what does it taste like? Though on paper the combination may seem strange, switchel strikes a nice balance between tartness (apple cider vinegar), sweetness (maple syrup), and spiciness (ginger).


The Benefits of Drinking Switchel:
Those early American settlers were certainly on to something when they discovered switchel. They may not have known then just why this beverage was so revitalizing, but today we have the benefit of a deeper understanding of human biology and the restorative power of plant compounds.

1. It Restores Electrolytes
Electrolytes are minerals present in bodily fluids, like blood and urine, that carry an electrical charge. We need these positively or negatively charged ions in our bodies – they transmit the voltage needed for many physiological functions such as muscle contractions and nerve signalling.

We lose electrolytes anytime we exercise, sweat, or go to the bathroom. Most commonly, electrolyte imbalance occurs during times of dehydration – when we lose fluids through rigorous physical activity or when we get the flu. The telltale signs of an electrolyte imbalance include muscle aches, anxiety, headaches, heart palpitations, stomach cramps, joint pain, fatigue, trouble concentrating, and dizziness. But electrolytes can be quickly replenished by consuming things that contain electrically-charged minerals like calcium, potassium, magnesium, sodium, and chloride.

Because switchel is made with apple cider vinegar – a rich source of potassium – and pure maple syrup (which also contains potassium, as well as calcium, magnesium, and sodium), it’s an all-natural alternative to sugary sports drinks that will help maintain a good electrolyte balance in the body.

2. It Helps Ease Pain & Inflammation
It’s no wonder that farmers toiling all day turned to switchel as their refreshment of choice: it combats pain and inflammation, allowing them to work just as hard the following day.

And indeed, switchel is a wonderful post-workout tonic. The key ingredient here is the presence of ginger, which not only suppresses pro-inflammatory enzymes associated with the aches and pains that often accompany intense exercise, it can also help with other expressions of inflammation like acne, arthritis, eczema, depression, and the physical signs of aging.

Gingerol – the active constituent of ginger – is an effective pain-reliever too, which works just as well as over-the-counter medications used to alleviate pain, but without any adverse side effects.

3. Get Your Daily Dose of Apple Cider Vinegar
In addition to replenishing electrolytes, there’s a lot of good reasons to imbibe apple cider vinegar! It helps balance the body’s pH levels, keeps blood sugar levels balanced, aids in digestion by fostering the growth of healthy gut bacteria, protects the heart, and promotes healthy weight loss.

While taking one tablespoon of apple cider vinegar with one cup of water may not be the most alluring beverage on the planet, switchel offers a tasty way to get your ACV fix.


4. Enjoy the Healthful Effects of Ginger
Unless you are already consuming an ample amount of ginger in your diet, you really don’t want to miss out on the amazing benefits of eating (or in this case, drinking) ginger.

Among ginger’s myriad benefits, it has been shown to help lower cholesterol, improve blood circulation, reduce blood sugar levels, and ease the symptoms of indigestion such as heart burn, bloating, and nausea.

Since gingerol has antioxidant properties, it can help give the brain a boost by improving mental processing, working memory, attention span, and reaction time.

5. The Hidden Wonders of Pure Maple Syrup
Although switchel can be sweetened with raw honey, the time-honored way to make it is with pure maple syrup. Like other natural sweeteners, real maple syrup is a much healthier alternative to artificial and refined sugars. As the only product in our diet that comes from tree sap, maple syrup is quite nutritious, containing a goodly amount of calcium, manganese, riboflavin, zinc, and potassium.

And because maple syrup is a plant-based sweetener, it also carries the advantage of a slew of antioxidants – 63 different types of free radical scavengers in fact, spanning gallic acid, catechins, and quercetin.


How To Make Traditional Switchel:
While there are several drink-manufacturers that have jumped on the switchel bandwagon (replete with extras like cherry and blueberry flavorings), it’s really easy to make your own switchel at home with these all-natural ingredients:

1/2 cup of apple cider vinegar (buy it here)
3 tablespoons of pure maple syrup (buy it here)
6 ounces of fresh ginger root
4 cups of water or club soda

Method:
To make, grate ginger root (or pass it through a juicer) until you have about of a cup. Combine ginger, apple cider vinegar, maple syrup, and water in a large container, and stir until the maple syrup has completely dissolved. If you grated your ginger, the bits will sink to the bottom of the container and this is perfectly fine. Pour over ice for immediate enjoyment or place the jug in the fridge and let it steep for 24 hours, stirring again before serving.

Add a modern twist by including mint leaves and a tablespoon of fresh lemon or lime juice.

Bacon-Ranch Fried Cabbage


INGREDIENTS->

1 Head cabbage
1/2 lb Cooked bacon
1 Whole white onion
1 Envelope Ranch seasoning mix
2 T. Olive oil

DIRECTIONS->

After cooking bacon drain and set aside. Chop onions and caramelize in Olive oil. Chop cabbage and add to onions, cover and let cook down a bit. Add Ranch mix and bacon and continue to cook down to desired doneness...I cook mine way down. Enjoy!

(recipe and photo borrowed from Skinny Body Care)